
How to Escape DONT SPLASH
Facts checked October 25, 2026 against live gameplay sources.
Quick answer
- An escape run is a chain of rooms; on Easy the HUD shows Rooms: 1/3.
- The five named hazards in order: Pillar Hall, Broken Walkway, Sinking Platforms, Rotating Bridges, Maintenance Lock.
- The run ends at the Maintenance Lock: open both valves (the machines are loud), then outrun the rising water to the exit.
- After the second valve, speed matters more than silence — the exit is the only objective.
What "escaping" means in DONT SPLASH
One run is built from rooms, and each room contains named stages. The HUD room counter (for example Rooms: 1/3 on Easy) tracks your progress through the run; each stage announces its hazard on a banner as you enter. The whole route at a glance:
Escape flow — six stages, one run
1
Pillar Hall
Stay low, follow arrows
2
Broken Walkway
Pick ONE lane, commit
3
Sinking Platforms
Never stop on light tiles
Standing still = tile sinks
4
Rotating Bridges
Board when aligned
Jumping at a closing gap
5
Maintenance Lock
Valve → pebble decoy → valve
Opening valves near the monster
6
Rising Water
SPRINT — silence is over
Grabbing "one more" pebble
To escape, you clear every room in the chain and reach the exit door that unlocks at the very end.
The wall text at the start of every run gives you the whole survival rule: "It can't see you. It hears the water." Everything below is about staying dry and managing the one room where being loud is unavoidable.
Stage 1 — Pillar Hall
The opening area is a field of columns standing in shallow water. The in-game ProTip tells you exactly what to do: stay low and move around the columns to hide. Follow the arrows on the walls, hop the platform gaps between pillars, and collect any pebbles from the stone piles you pass — you will want them later.
There is no complex mechanic here. It exists to teach the rhythm: land in the middle of tiles, never touch the surface below, and keep the monster's position in the corner of your eye as it circles through the water.
Stage 2 — Broken Walkway
The second area splits into two routes, and the banner names both: narrow ledges with short jumps or wide platforms with long jumps. This is a playstyle choice, not a puzzle:
- Narrow ledges demand precise foot alignment, but the jumps themselves are short. Slip off an edge and you splash.
- Wide platforms are easy to land on, but the gaps require full sprint jumps — mistime one and you fall short.
Pick the lane that matches your confidence and commit to it. Stopping in the middle of the walkway to reconsider leaves you standing on a fading platform.
Stage 3 — Sinking Platforms
The banner carries the rule: "Platforms sink while you stand on them. Keep moving. Dark border platforms are safe." Ordinary light-colored tiles start submerging the moment your feet touch them — linger and the tile drops below the surface, which counts as a splash.
Dark-bordered tiles never sink. Use them as rest stops: scout the next sequence, watch the monster, or line up a pebble throw. The rhythm is hop-hop-hop onto a dark tile, breathe, then hop again. Players consistently report that these tiles sink faster than they expect — one player's recorded reaction: "They sink very fast."
Stage 4 — Rotating Bridges
The fourth stage adds movement: long mechanical planks rotating over the water. The banner says "Ride the rotating bridges. Time your jump onto the platforms." The working pattern:
- Wait at the edge of the fixed platform until the rotating plank swings toward you.
- Board the near end as it aligns — do not jump at a gap that is still closing.
- Ride the rotation until the far end lines up with the next fixed platform.
- Step off immediately; do not try to ride it a second revolution.
If the monster is circling beneath your exit point, throw a pebble to the opposite side before you step off. Jumping at a closing gap is the single most common run-killer in this stage.
Stage 5 — Maintenance Lock: the two valves
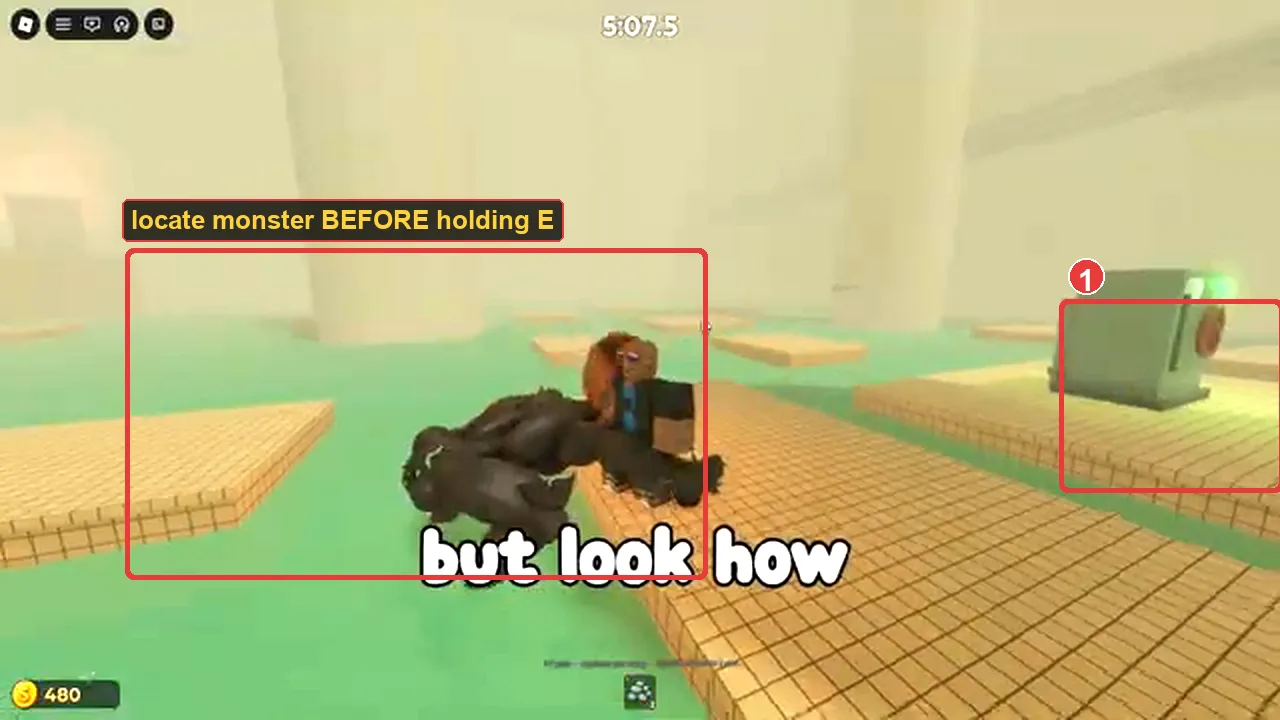
Every run ends here. The banner: "Open both valves to unlock the door. The machines are loud." Two red valve wheels sit on cabinets across the room's wings. Approach one until the E / Maintenance control / Open valve prompt appears, then hold E while the progress ring fills. A message — Valve opened (1/2) — confirms the first.
The catch is in the banner: the machines are loud. Each valve is the mechanical equivalent of a splash, and the monster comes to investigate. The proven sequence:
- Locate the monster before touching anything.
- Open the first valve when it is far.
- Throw a pebble to the far side of the room to pull it away from the second cabinet.
- Move to valve two and open it while the decoy holds.
In co-op, teams split this: one player opens while the other throws pebbles to manage the monster. Solo, your own pebbles do both jobs — which is why the Throwing Range upgrade is the first purchase this guide recommends. See the annotated valve-room photo below, then watch the full clean run in the video.
The rising-water sprint
The moment the second valve opens, the water starts to rise and the run flips: speed now matters more than silence. The exit door is unlocked and usually above you — climb the yellow blocks toward it, grabbing pebbles only if they sit directly on your path.
How fast does it rise? One player measured roughly 60 seconds before the water covers the route — treat that as a hard ceiling, not a target. Watch for the warning panels ("platforms under in 30 seconds") and treat them as a no-looking-back order: the exit is the only objective left. Drown in the rising water and the run ends there.
Escape times to compare against
From recorded runs: a clean solo Easy escape takes about five minutes across the three rooms. Recorded clears range from 5:25 up to 14:39 — the gap is almost entirely deaths, not difficulty. If your attempts consistently run past fifteen minutes, the problem is usually valve order and monster management in the Maintenance Lock, not platforming skill.
How to escape FAQ
Can you skip stages in a run?
No skipping has been observed — each room must be cleared in order, and the room counter only advances when a room's objective completes. Stages inside a room do not count individually.
What happens if you die mid-run?
In co-op, a downed player can be rescued by teammates (they press G at the prompt; you press H to call for help). Solo, a mistake is a full down. A "Progress saved" message appears in the third room, but whether a saved run survives a death or disconnect is unverified — do not rely on it.
Is the escape route different on Hard?
The stage names and banners stay the same, but Hard maps are longer with fewer platforms and tighter jumps. See the stages overview for the difficulty breakdown.
Keep Reading
Ready to try it yourself?
Play DONT SPLASH on Roblox